Character Sheet for AI: How to Make One, Step by Step
How to make a character sheet for AI: which views to include, what to leave off, how to prep references or a description, and how to put the sheet to work.
What a Character Sheet for AI Is
A character sheet shows one character from several angles so that everything made later matches it. Animators and illustrators have used them for decades, as model sheets and turnarounds. A character sheet for AI does the same job for a different reader: instead of guiding an artist's hand, it is the reference image a model works from every time it draws your character.
That different reader changes what belongs on the page. This guide covers which views to include, what to leave off, and how to make a sheet on Genfire from references, a description or a set of traits. For why AI characters drift in the first place, start with consistent character AI.
How an AI Sheet Differs From a Traditional Model Sheet
A traditional model sheet is made for people. It's covered in labels, height lines, arrows, colour swatches and panel borders, because an artist reads them as notes. A model doesn't. Text, arrows and swatches on a reference image can be read as part of the character, and you end up with lettering on a jacket or a stray line through a shot. So a sheet built for generation shows only the character: no words, numbers, labels, logos, borders, grids, arrows or swatches, and no extra props.
A few more rules follow from the same idea:
- One continuous backdrop, the same plain colour behind every view, with no floor line, horizon or visible seams.
- Soft, even studio light, so no view hides detail in shadow.
- A neutral pose and expression. Facing the camera, arms relaxed at the sides. A dramatic pose gets baked into the reference.
- The whole figure in frame. Head to feet in every full-body view. Cropped shoes are shoes the model will make up later.
The Three Views That Matter
A full turnaround usually adds side and three-quarter views. For holding an identity in AI generation, three views do most of the work, and they fit side by side in one wide 3:2 image.
- 1Close-up portrait. Head and shoulders, facing the camera, neutral expression. This is where the face lives: eye spacing, nose, hairline, marks and quirks.
- 2Full-body rear view. Standing upright, seen straight from behind. This is the panel people skip, and it's the one that saves you later. The back of the hair, the back of the outfit, the heels of the shoes: without it, a model invents them the first time your character turns away.
- 3Full-body front view. Standing straight on, arms at the sides, head to feet. Build, proportions and wardrobe in one frame.
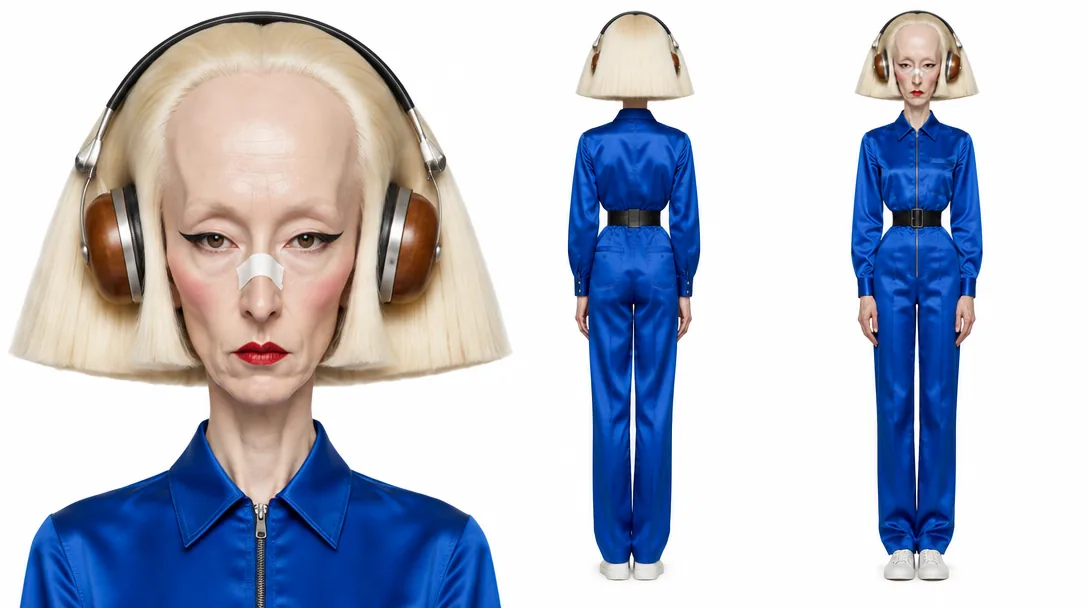
Genfire's AI character sheet generator renders exactly these three views, left to right, in one image.
Two Ways to Make One on Genfire
| Character Sheet app | AI Influencer Studio | |
|---|---|---|
| Starts from | 1 to 8 images of one character, or a written description | Traits and a tier, a description, or one photo of yourself |
| Rendering style | Keeps the style of your references | Photoreal editorial |
| Backdrop | Neutral grey | White seamless |
| Becomes an @handle | When you save it as an influencer | Straight away |
Both render the same three views with GPT Image 2.5 Sunburst. Use the Character Sheet app when the character already exists, as drawings, 3D renders or photos, or when you have a clear description in mind. Use the AI Influencer Studio when you're inventing someone new and want to cast them trait by trait.
Step by Step: The Character Sheet App
Open the Character Sheet app from the Apps page. It has two inputs, Character References and Description, and you need one or the other.
Step 1: Gather your references
Upload one to eight images of the same character, as JPG, PNG or WEBP. Photos, drawings and 3D renders all work. Different angles help most: a front shot, a three-quarter and a back view tell the model more than eight near-identical shots from the same side.
Keep it to one character per image, cropping out anyone else, and one style across the set. The sheet keeps the rendering style of your references: a photograph stays photographic, and an illustration, painting or 3D render keeps that exact style, so mixing styles gives it two looks to choose between.
Step 2: Add notes for what the images don't show
With references added, the Description box becomes a notes field. Use it for what the images miss: "the jacket is dark green", "black leather boots", an embroidered back panel.
Where your references don't show something, such as the back of the outfit, the sheet continues it consistently with what they do show. A note turns that continuation into a fact. Keep notes short and concrete: they are added to the sheet's direction, not treated as a second prompt.
Step 3: Or write a description instead
No images yet? Leave the uploads empty and describe the character in the Description box. With no references, the description is the whole character, so write it head to toe:
- Who they are, in a line.
- Face and hair: shape, colour, anything unusual.
- Build and height.
- The full outfit, down to the shoes, including the back if it matters.
- The rendering style.
That last point matters. Name the style you want, such as a photograph, an illustration, a painting or a 3D render. If you name none, the sheet comes out as a photograph.
Here's a description based on one of the studio's house characters, the Spit-Curl Concierge:
A slim hotel concierge in his late thirties with a haughty blank stare. Glossy black hair pressed into a smooth helmet, with one lacquered spit-curl coiled into a perfect circle on his forehead. A pencil moustache, faintly powdered skin. A mustard silk suit, scarlet satin shirt, chocolate knit tie and tan brogues. Photographed.
Step 4: Pick the detail level
Choose Low, Standard or High detail. Low is the fastest, with rougher detail, fine for a first look. Standard balances detail and cost while you try a look. High detail is the default and gives the best likeness to your references. The price on the button updates with the setting before you run.
Step 5: Generate and check the sheet
The sheet renders as one landscape image, 1536 × 1024 at 3:2, with the close-up portrait, rear view and front view on a seamless neutral grey backdrop. Before you build on it, check it like a casting director would:
- Same character in all three views? Face, hair, skin tone, proportions, colours and accessories should all match.
- Is the rear view right? If the back isn't how you picture it, add a note and run again.
- Head to feet? Both full-body views should include the shoes.
- Clean? No text, lines or swatches anywhere.
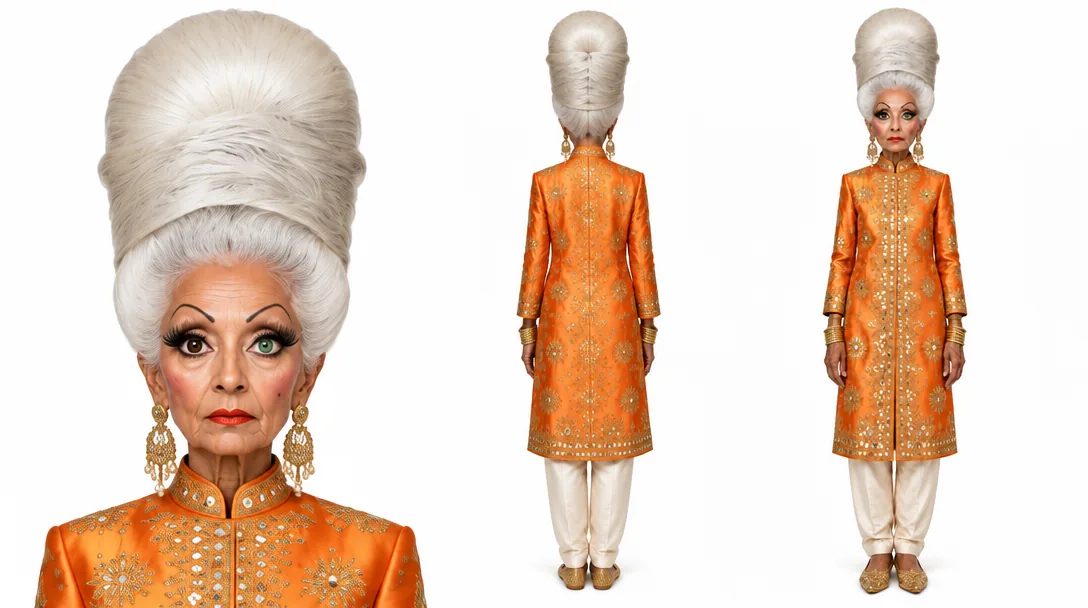
Making a Sheet in the AI Influencer Studio
If the character doesn't exist yet, the AI Influencer Studio builds the character and the sheet in one pass. Pick traits section by section (build, height, hair, face, eyes, style and accessories) and a tier: Average stays believable, Bold lets the quirks show, and Extreme goes surreal while staying photoreal. Add your own words for anything the traits miss, or one photo of yourself to keep your face.
The studio renders the same three views on white seamless, like the sheets in this guide, and saves the character under an @handle straight away. For a shortcut, open any character on the studio's cast wall and press Recreate to load its traits and brief into the builder.
Putting the Sheet to Work
A sheet earns its keep when you use it.
- Save it as an influencer. A sheet made from your references becomes the identity behind an @handle as it is, with nothing rendered again. Mention that handle in an image or video prompt and the sheet goes along as the identity.
- Use it as a reference image in any tool.
- Wire it into a workflow. The workflow editor has a Character Sheet node that turns a wired image into a sheet as one step of a larger pipeline.
- Put it in motion. In Genjudo, your character image is the cast. The direction binds it to a role as
@Image1, and Seedance 2.5 has your character perform any clip's moves with the same timing and camera move. A second image can cast a second character, a garment or a location.
To keep that character steady across a whole series of images and videos, the consistent character generator page shows the loop end to end.
Use Characters You Have the Right To
Make sheets of characters you created, of yourself, or of someone who has agreed. Genfire's terms don't allow using a real person's likeness without their express authorization.
What It Costs
Sheets are paid in Genfire credits from the same balance as 80+ image, video and audio models, and the exact price shows before you run. Credit packs start at $19, purchased credits stay valid for 12 months, and every pack comes with a commercial-use licence. You can make your first sheet in the AI character sheet generator; pack details are on the pricing page.
FAQ
What should a character sheet for AI include?
Three views of the same character on one plain backdrop: a close-up portrait, a full-body rear view and a full-body front view. Leave off labels, arrows, measurement marks, colour swatches and panel borders, because on a reference image those can be read as part of the character.
Is a character sheet the same as a character turnaround?
Close. A full turnaround usually adds side and three-quarter views. For holding an identity in AI generation, the face up close plus the whole figure from the front and from behind cover what a model needs most, and they put the back of the hair and outfit on record before you need them.
Can I make a character reference sheet from my own drawings?
Yes. The Character Sheet app takes up to eight images of one character, including drawings, paintings and 3D renders, and keeps their rendering style, so an illustration stays an illustration.
How many reference images do I need?
One is enough to start, and the app accepts up to eight. Different angles help more than many similar shots. With no images at all, describe the character head to toe instead, including the style you want; if you don't name one, the sheet is rendered as a photograph.
Can I use my character sheet in AI video?
Yes. Once the sheet belongs to an influencer, mentioning its @handle carries it into video prompts as the identity. In Genjudo, the sheet goes in as the cast image, and Seedance 2.5 has your character perform a clip's moves.